Photography Tips for Capturing the Basilica Cistern\'s Beauty
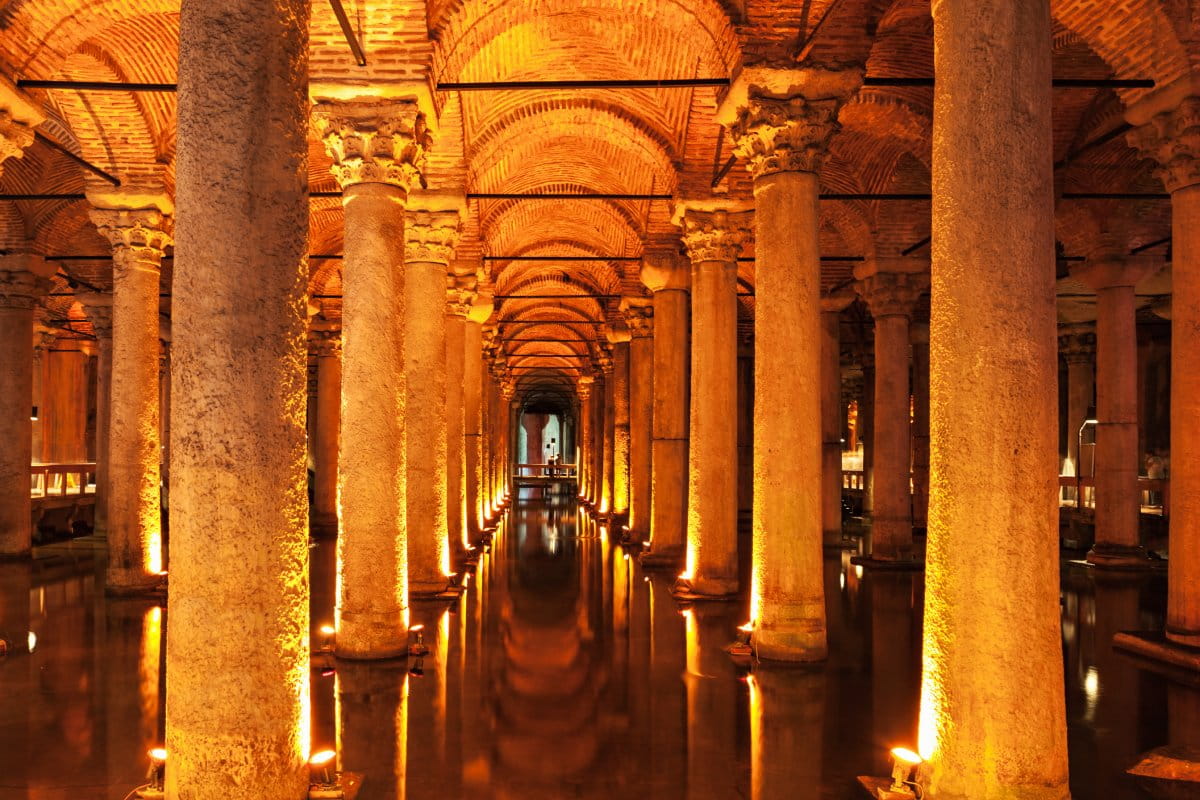
Stepping into the Basilica Cistern feels less like visiting a museum and more like entering a forgotten realm beneath the bustling streets of Istanbul. As you descend the stone stairs, the temperature drops, the sounds of the city fade away, and you are greeted by the rhythmic sound of dripping water echoing against ancient brick vaults. For a photographer, this location is a dreamscape of shadows, reflections, and symmetry, but it also presents a unique set of technical challenges that can frustrate even experienced shooters. The lighting is dim and dramatic, the walkways restrict your movement, and the sheer scale of the "Sunken Palace" is difficult to convey in a single frame. However, with the right preparation and a few insider techniques, you can capture images that truly reflect the haunting beauty of this Byzantine masterpiece.
Mastering the Low-Light Challenge
The defining characteristic of the Basilica Cistern is its darkness, illuminated only by artfully placed spotlights that shift in color and intensity. While this lighting design creates a mystical atmosphere perfect for the naked eye, it pushes camera sensors to their limits. Since tripods are generally prohibited to prevent obstruction on the narrow walkways, you must rely on handheld techniques and understanding your camera's exposure triangle intimately. The key is to find a balance where you capture enough light without introducing distracting motion blur or excessive noise. You need to embrace the shadows rather than trying to eliminate them, as the darkness is as much a part of the composition as the illuminated columns.
Modern camera sensors have improved significantly in handling high ISOs, so do not be afraid to push your ISO higher than you normally would outdoors. A grainy photo that is sharp is always preferable to a noise-free photo that is blurry due to a slow shutter speed. If you are shooting with a DSLR or Mirrorless camera, using a fast lens is non-negotiable. A prime lens with an aperture of f/1.8 or f/1.4 will allow significantly more light to hit the sensor compared to a standard kit lens. For those using smartphones, the computational photography found in modern "Night Modes" works wonders here, stacking multiple exposures to create a single, well-lit image.
Recommended Camera Settings
To help you navigate these tricky conditions, here is a quick reference guide for setting up your gear before you start shooting. Adjust these baselines according to the specific lighting of the area you are standing in.
| Setting / Gear | DSLR / Mirrorless | Smartphone |
| Mode | Aperture Priority (Av/A) or Manual | Night Mode / Pro Mode |
| Aperture | f/1.4 to f/2.8 (Wide open) | Fixed (usually f/1.7 - f/2.2) |
| ISO | 1600 - 6400 (depending on noise tolerance) | Auto (or cap at 2000 in Pro Mode) |
| Shutter Speed | 1/50s minimum (1/30s if you have steady hands) | Hold still for 3-5 seconds |
| White Balance | Auto or Tungsten (cools down orange lights) | Auto |
| Focus Mode | Single-point AF or Manual Focus | Tap to Focus |
| Image Stabilization | On (Lens or In-Body) | Automatic (usually enabled in Night Mode) |
Pro Tip: When using Aperture Priority mode on your DSLR or Mirrorless camera, keep an eye on the shutter speed. If it drops below 1/50s, increase the ISO to compensate and avoid blurry images. For smartphone users, experiment with the exposure compensation slider in Pro Mode to fine-tune the brightness without sacrificing detail.
Composition Techniques and Best Angles
Once you have your settings dialed in, the next hurdle is composition. The cistern features 336 marble columns arranged in precise rows, creating a visual feast of leading lines and symmetry. To capture the vastness of the space, look for angles where the columns seem to stretch into infinity. Standing dead center on a walkway and shooting straight down the row of columns is a classic technique that emphasizes the architectural perfection of the Romans. Use the water to your advantage; the shallow water at the bottom acts as a perfect mirror. By positioning your lens as close to the railing as possible (or through the gaps if safe), you can capture the reflection of the columns, creating a symmetrical diamond shape that adds depth and surrealism to your image.
Don't forget to look for the details that tell a smaller story within the grand hall. The textures of the columns vary, as many were recycled from other ancient structures. Some are smooth, while others, like the famous "Crying Column" (Hen's Eye column), feature intricate carvings that are perpetually wet. When photographing these specific details:
- Get close: Fill the frame with the texture of the stone to showcase the erosion and history.
- Side lighting: Wait for the rotating lights to hit the column from an angle, which enhances the relief and texture of the carvings.
- Isolate the subject: Use a shallow depth of field (low f-number) to blur the background columns, making your specific subject pop.
Example: Imagine capturing the Crying Column with the light grazing its surface, highlighting the teardrop patterns. Using an f/2.0 aperture will blur the surrounding columns, drawing the viewer's eye directly to the unique texture of the Crying Column.
Capturing the Medusa Heads
The two Medusa heads located at the far northwest corner of the cistern are the most photographed objects in the entire structure. One is positioned sideways, and the other is upside down, serving as column bases. Because this area is a bottleneck for visitors, patience is your best tool. Avoid using a wide-angle lens here if it includes too many tourists in the frame; instead, use a tighter focal length (around 50mm or 85mm) to focus solely on the visage of Medusa. Try to capture the shot when the lighting shifts to a cooler tone or a deep red, which enhances the mythological and slightly eerie vibe of the Gorgon heads. If you are visiting in January 2026, the crowds might be thinner on weekday mornings, giving you a rare chance to step back and include the water reflection of the heads.
Tip: Try shooting the Medusa heads from a low angle, using the water's reflection to create a symmetrical image. This can add a sense of drama and make the heads appear even more imposing.
Conveying the Magical Atmosphere
A technically perfect photo is good, but an emotional photo is better. The Basilica Cistern is all about atmosphere—the interplay of light and shadow, the dampness, and the mystery. To convey this mood, you need to pay attention to color and silhouettes. The modern lighting system installed during the restoration changes colors periodically. While some photographers prefer the natural warm look of the stone, the teal and blue lighting can give the water a deep, oceanic feel that looks stunning in photos. Experiment with shooting the same composition under different light colors to see which one evokes the feeling you experienced while standing there.
Silhouettes are another powerful way to show the scale of the place. Since the walkways are often backlit by the column lights, capturing the dark outlines of visitors gazing up at the ceiling can provide a sense of scale. A human figure silhouetted against the massive, illuminated columns instantly shows the viewer just how grand and imposing the underground chamber really is. This technique also solves the problem of having strangers in your photos; instead of being distractions, they become anonymous subjects that add life and context to the architecture.
Mobile Photography Specifics
If you are shooting with a smartphone, you have some distinct advantages and disadvantages. The biggest advantage is the size of the device, which allows you to place the lens right between railing bars or close to the water surface for unique perspectives that big cameras cannot reach. Use the "tap to focus" feature and then drag the exposure slider down slightly. The camera will naturally try to brighten the dark scene, which can result in a washed-out look that destroys the mood. By lowering the exposure manually, you preserve the rich blacks and the dramatic contrast of the spotlights.
Avoid using your phone's flash at all costs. The flash will illuminate the dust particles in the air, creating unsightly white spots in your image, and it will flatten the beautiful depth created by the ambient lighting. Furthermore, the flash will annoy other visitors and ruin the serene experience for everyone around you. Instead, lean your elbows on the railings to stabilize your body, breath out slowly, and take the shot. If your phone has a "Live Photo" or "Long Exposure" simulation mode, use it to smooth out the ripples in the water, creating a glass-like reflection that looks professional and artistic.